Find Available Appointment Times
The Find Available Appointment Times window provides users with the capability to find (and schedule) future appointment time slots with availability for specific clinics and providers.
For a video demonstration of the Find Available Appointment Times window, click here.
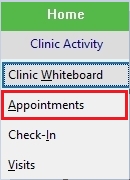
Navigate to the available Appointments window
-
From the Home Nav bar
-
Select Appointments
-
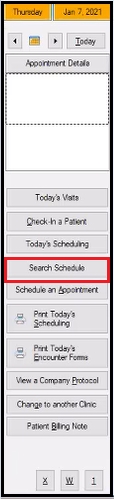
Select Search Schedule to display the Find Available Appointment Time
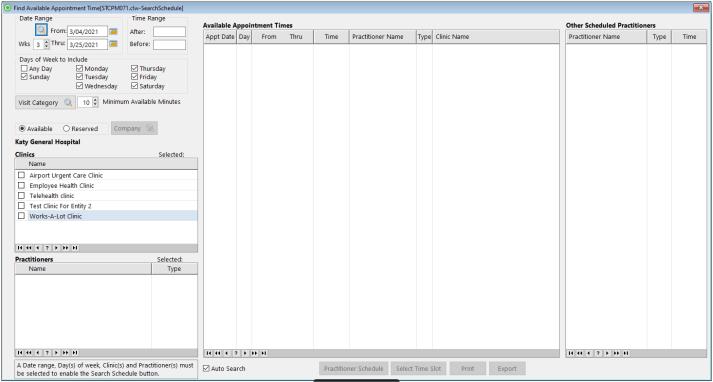
Window Criteria
Below is the descriptions for each of the criteria options on this window.
| Sections | Descriptions |
|---|---|
| Date Range | |
|

The Magnifying Glass icon will allow you to select how far out in the future you want to begin your search for available appointment times. For example: Today, Tomorrow, In 2 Weeks,etc. Choosing this option will preset the From / Thru dates to reflect your choice.
Use the Calendar icons to select From and Thru dates to customize a search range of available appointments. You may also directly enter your dates in the space provided. The default is blank. Once you exit this window, the software will save your date selections for only those dates selected using the Magnifying Glass icon. |
|
This field will preset the length of your date search range. Use the up and down arrows to select 1 -4 weeks. The default is 2 weeks. Changing the weeks will cause the Thru Date to change. Once you exit this window, the software will save your Weeks selections |
| Time Range | |
|

Enter your After and Before times in the space provided to specify a time range to a search for available times, (i.e. 8:00AM - 11:00AM). Time may be entered in standard or military format. The default is blank, which will result in all hours that the clinic is open and the practitioner is available. |
| Days of the Week | Select the specific days you want to search by checking the box next to day of the week. Default is all days are selected (checked). |
| Visit Category |
Click this button to display the Select Visit Category Code window so that the Minimum Available Minutes field is preset as part of the search criteria. The category will display below this field. The Visit Category is optional. If a specific Visit Category is selected, the predetermined number of minutes for that category are inserted into the Minimum Available Minutes field. This number may be manually overwritten using the Minimum Available Minutes field up and down arrows. |
| Minimum Available Minutes | Use the up and down arrows to select the minimum number of minutes needed for the appointment. You may also directly enter the minutes in the space provided. The default in 10 minutes. |
| Availability |
Click the Available radio button to search for available appointment times. Available is the default setting. Click the Reserved radio button to search for available times where time is reserved for a particularly company. You must select a company (click the Company button). This will produce a list of possible block-times based on your search criteria. |
| Clinic Section | |
|
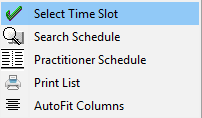
Select the clinic(s) you want to search for available time Check the box beside the clinic(s) you wish to search by clicking the clinic(s) name as an on / off toggle. This will act as a filter so that appointment times for only those clinics will be included as possible choices. Once a clinic is selected, the practitioner resources for that clinic become available in the box title "Practitioners" so that you may select the specific resources you want to search. If you right click on the clinic, an options menu will display:
The default setting is "all clinics" listed, but unchecked. |
| Practitioner Section | |
|
This is a combined list of practitioners (resources) that are available for all of the selected clinic(s). There are two types: Physicians and Clinicians. At least one clinic must be selected in order to select practitioners. Select the practitioner(s) you want to schedule. Check the box beside the practitioner(s) you wish to include in the search by clicking the practitioner(s) name as an on/off toggle. This will act as a filter so that appointment times for only those practitioner(s) will be included as possible choices. If you right click on a practitioner, an options menu will display:
Default is no practitioners listed. The system will only list a selection of practitioners for the clinic(s) selected. |
| Available Appointment List |
Column displays may be customized, see Column Header formats. Rows can be customized to auto fit the column size. |
|
On this date, there is available time. The date will show in MM/DD/YYYY format. This date will fall within the selected search range. |
|
Day of the week that has available time based on your selection criteria. |
|
Earliest open time of the day that has available time based on your selection criteria. |
|
Latest time of the day that has available time based on your selection criteria. |
|
The total amount of Available time. |
|
Type of Practitioner (i.e. Physician, Clinician). |
|
Clinic(s) name that has the available time. |
|
Clinician or Physician name that has the available time. |
| Other Scheduled Practitioners |
The "Other Scheduled Practitioners list will display information when a row is selected Available Appointment Time List. The information that will display in the "Other Scheduled Practitioners" list will be practitioners in the same clinic that are scheduled during the available time. Rows can be customized to auto fit the column size. |
|
Once a specific time and date are selected from the available appointment list, the resource panel will populate. This list will display other resources that are scheduled in the clinic of the available time selected during the available time. Right click anywhere in the list area will display a menu to allow you to execute the same buttons as listed at bottom of the window.
|
|
Indicates the type of resource (i.e. Physician or Clinician). |
|
The start time of the appointment. |
| Search Options Across the Bottom of the Window | |
|
Check this box to refresh the search results each time any of the filter criteria is changed. Search Schedule will only display when the Auto Search option is unchecked. When the Auto Search button is unchecked, the user must select Search Schedule after changing any search criteria in order to refresh Available Appointment Times list. When the Auto Search option is checked the appointment times are automatically refreshed when any search criteria is changed. |
|
Complete the filters on the left of the window and Search Schedule becomes available at the bottom. Select it to list all possible appointment times based on your filter criteria. If the Auto Search option is checked this option will be unavailable. |
|
This will re-direct users to the View Practitioner Clinic Schedule. It is a look at a specific provider for a specific clinic and covers the same period of dates and times as your Available Appointment window search criteria. You may schedule an appointment from the View Practitioner Clinic Schedule window. |
|
Highlight the desired time slot from the list and click Select Time Slot to begin the scheduling process. The software will display the time slot selected on the Appointment Scheduling window. Complete the schedule to add the appointment to the calendar. |
|
Click Print to create a report in the same format and order as on-screen display results. For example:
|
|
Click Export the results of this search list for further review or follow-up. The results can be saved as a comma delimited (csv), html, json, or a formatted xml file. |


All window settings are saved when users exit the window. For example: column sizing or sorting.
Schedule an Available Appointment
After making your filter selections from the bottom of the Find Available Appointment Time window select Search Schedule. All available time slots will display.
-
Locate the date and time you want to schedule for this provider.
-
To open the calendar to the day you want to schedule
-
Either click the right button on your mouse and click Select Time Slot
-OR-
-
Double click on the row
-
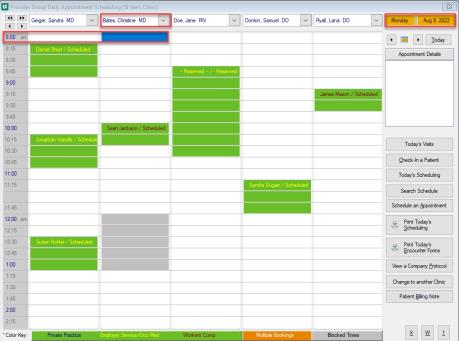
The Provider Group Daily Appointment Scheduling window opens. If the Provider has more than one time slot available the highlighted slot will be the first available time slot. Select the correct time slot and schedule the appointment.
View Practitioners Clinic Schedule
You may view a particular practitioner’s clinic schedule from the Find Available Appointment Times window.
Click the View Practitioner button at the bottom of the window:

The following window will display:
-
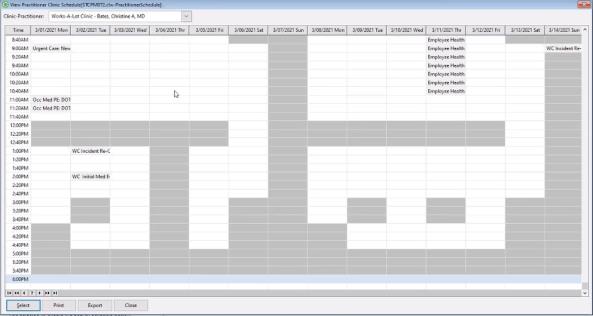
This window will show which appointment times (for a specific practitioner) are available based on all of the search criteria inherited from the Find Available Appointment Times.
-
The gray blocks denote unavailable time slots. Unavailable time will include time outside of the clinic hours, as well as the practitioners non-preferred time.
-
You may select a time slot by highlighting your choice and double-click or click the Select button at the bottom of the window. The Provider Group Daily Appointment Scheduling window will allow you to finalize the appointment time.
-
The Clinic Practitioner dropdown menu will display the available practitioners based on your selections from the Find Available Appointment Times window.
-
Print: Click this button to print the practitioner's clinic schedule for further review or follow-up.
-
Export: Click this button to export the practitioner's clinic schedule for further review or follow-up. The results can be saved as a comma delimited (csv), html, json, or a formatted xml file.
Column Header formats.
Columns may be customized.
Right click on a column header and the following dialog will display.
Select Hide Column to remove that column from the browse.
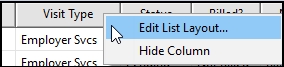
Select Edit List Layout to display the following dialog.
To customize the window:
Use the buttons to the left of the dialog.
Columns can be hidden or displayed.
You can also arrange the display position within the browse, as well as locking or unlocking each column.
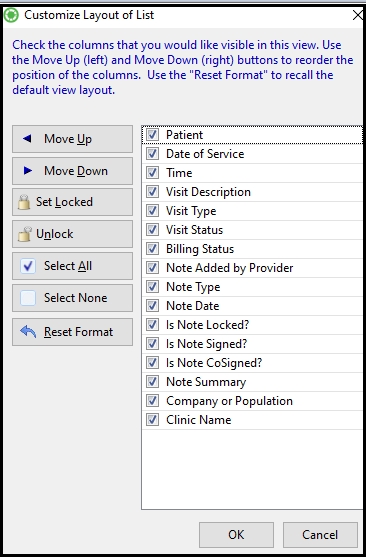
| Selection | Description |
|---|---|
| Move Up | Slide the selected column one position up (to the left) |
| Move Down | Slide the selected column one position down (to the right) |
| Set Locked | Freeze the column position so it does not move when using the scroll bars |
| Unlock | Unfreeze the column position so it does move when using the scroll bars |
| Select All | Select all columns |
| Select None | Un-select all columns |
| Reset Format | Reset the columns to the system defaults |
Row Auto-size
Right click on any row will allow you to select Auto-Fit the column width.